Yoga Tutorial

Demystifying Sun Salutations

Yes sun worshiping is real and it is actually very logical, as well as being an ancient practice. In yoga you hear about Sun Salutations, or the Sankrit term, Surya Namaskar. Surya is sun. Nama means to bow to or adore. We stand at the front of our mat with our hands together at our hearts center in the same position as we typically start and end our practice with namaste mudra, which translates into the divine light in me honors and sees the divine light within you. So, as we move through the Sun Salutations we take our arms up toward the heavens and then we bow forward turning our awareness inward and committing to our health and to our higher awareness. With each movement we aspire to gain wisdom and knowledge and to become the best versions of ourselves. It really is a prayer in motion.

Sun Salutation A, Surya Namaskra A

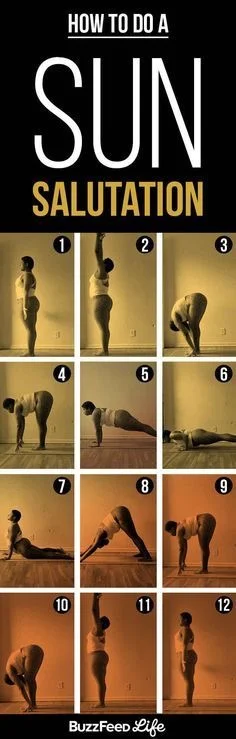
There are 12 postures within a Sun Salutation, which is also symbolic because there are 12 Sanskrit terms for the word sun. Moving through these 12 postures in consecutive sequence in repetition warms & energizes the  body. Sun Salutations engage the core, stretch the hamstrings and loosen the shoulders. They improve circulation, massage internal organs and promote overall health. So you can use sun salutations as an excellent warm up, or start to your yoga or workout session. Or when you are short on time and energy, it can be used as your minimum daily go to for giving you a total body workout. 

Sun Salutations can be beautifully adapted for your personal needs and can even be done from a chair.  When practiced at a slower pace they provide a calming grounding effect, and when practiced at a faster pace they provide a good cardiovascular workout and can provide weight loss. 

Why start the day day with Sun Salutations? Yoga was developed over 5000 years ago by ancient Sages in India who believed each part of the body was linked to some part of the natural world. The solar plexus (located behind the belly button) is said to be connected to the sun and associated with our emotional well being and intuition. We practice Sun Salutations first thing in the morning to clear our minds, gain calmness for the day ahead and to heighten our intuition. 

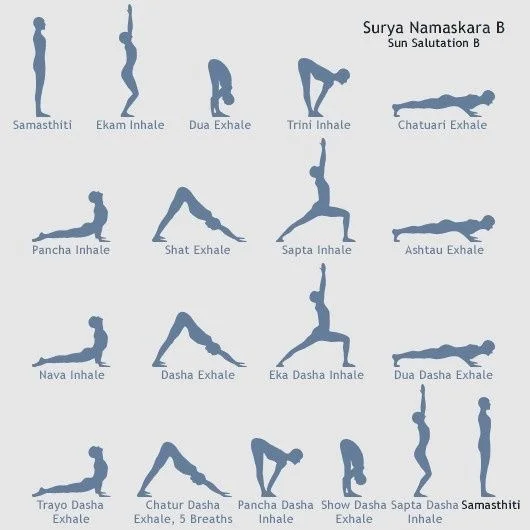
Then move on to Sun Salutations B to create more heat continuing with 3-5 B's

Lets face it, we all love a little sunshine. It feels good and makes us happy. The sun grows our fruits, vegetables and flowers. It also creates light, and as we know that light helps us conquer our fears, so salute the sun. Practice Sun Salutations each day and feel yourself growing stronger, your light illuminating brighter and the warmth glowing within you. Make time for this important practice every single day. It only takes 15-20 minutes to do a proper 3-5 Sun Salutations A and Sun Salutations B sequence and you will greatly appreciate the many benefits that you will discover through this practice. 

Sun Salutation A:

Inhale taking your arms up

Exhale bowing forward

inhale halfway up straight spine

exhale hands to earth, step back to plank and lower yoga push up

inhale upward dog

exhale downward dog (hold 3-5 breaths)

       ~work to get your heals toward the earth 

       ~relax your ears between your arms

        ~let all the busy thoughts of the day and week go as you breathe in through your nose & out through your nose

Inhale look to your thumbs

Exhale to the front of the mat 

Repeat 3 to 5 times

Sun Salutation B:

Inhale sweep arms down and up as you come into chair pose 

Exhale forward fold straightening legs

Inhale halfway up, look to horizon

Exhale hands to earth and hop back to Chaturanga (yoga push up)

Inhale heart to the sky

Exhale hips up and back to down dog 

Inhale right foot to right thumb, Warrior One

Exhale Down Dog

Inhale Left Foot to Left Thumb, Warrior One

Exhale Down Dog stay here and re connect with your breath

Relax your neck & shoulders

Consider scissoring your heels, pressing one heel at a time to the earth and lifting the opposite heel

Inhale look to your thumbs

exhale hop to the front of your mat

Repeat 3-5 times

Wishing you all an inspiring start to your week!

Shine On,

Libby

P.S. If you have questions about how to get started in your practice, how to modify postures or if you would like personal, private or corporate lessons, please contact me via email: libby@yogafitboutique.com. I would be happy to travel and I always love to connect. Namaste!  

How to do a Headstand: 6 Steps to a Safe Headstand Using a Solid Foundation to Achieve Your Goals

It's a brand new week so it is the perfect time to set new goals. Make a list of easy ones that you would like to accomplish today. Next, make another list of slightly bigger goals you would like to accomplish this week. Finally, write down several really, really big dreams! If you believe they will happen and work toward them, you will likely achieve your goals!

The first step is getting started, and honestly that is usually the hardest part. Building a firm foundation is key. In relationships that foundation might include honesty, respect, communication and many other joint things of importance. For financial goals and manifesting abundance, it may involve a solid education, connections in your field of interest, and many hours of dedication and perseverance. In yoga, a firm foundation requires a regular disciplined practice. Through this regular practice you build the strength and flexibility allowing you to advance. You create awareness on the mat that then carries off the mat and into your daily life. And all of these experiences affect your practice! After all, the body and mind are deeply connected. 

Today I will show you the basic foundations for learning how to do a safe and sturdy headstand. This method will allow you to graduate into the full inversion as you feel ready; letting go of your fears and building your core strength. It is very important to use your core and to listen to your body! If you feel too much pressure on your neck, come immediately out of the posuture!  

Here are the 6 steps for safely doing a headstand:

1. Start in downward dog position. Drop to your forearms and interlace your fingers around your head. Bring your big toes together, then walk your toes in toward your elbows. Stay here and breathe to build strength and get used to having your head below your heart, OR move to step 2. 

2. Lift one leg at a time using your core strength. Keep your knees bent and legs close to your body coming into egg position. Feel free to do this with your back close to a wall and your mat doubled under your head and arms.  

3. Once both knees are up you are in control. You can slowly lift one leg at a time all the way up, or if this is enough for you at this moment, simply come back down.  

4. Keeping your knees bent as you raise your legs allows your center of gravity to stay low. So, if you feel wobbly, simply lower your legs and come safely back down.

5. Go slowly. Take your time. Press into your forearms to relieve pressure on the neck. Eventually, you will have the strength to press all the way up so that your head leaves the ground.

Photography by Morgan McAvoy

6. Finally, you can lift all the way up and achieve a full headstand. To come down safely and in control you want to practice coming back into that egg position. Remember, listen to your body. This is not the place for the ego to be involved. Safety is a priority.  

Practicing headstands has many benefits including: stress relief, increased focus, improved digestion, increased shoulder and arm strength, decreased fluid build up and retention in the legs, ankles, and feet, and increased core strength. Headstands also stimulate the lymphatic system. Not to mention they are fun and bring out your inner child!

It is so important to remember to have fun in life and continue to grow and accomplish new things! We are NEVER too old. Age is simply a number. What is important is how we feel. So get to it! Set your personal goals and make them happen. Feel the energy rise as your dreams start to come true! 

My personal short term goals this week are to: 

1. Finish organizing my studio space at home.

2. Make and deliver treats to families I know who are struggling.  

3. Clean and put away all of my laundry (dirty secret revealed! I tend to throw clothes on top of my dresser instead of actually opening the drawers).  

My longterm goals are to: 

1. Make an instructional video and DVD.

2. Plan and implement yoga retreats.  

3. Grow the audience for this blog and website by offering high quality content.

Feel free to comment and share your goals! I would love to hear from you. Remember, these are the starting points. If you do not accomplish them today or this week, forgive yourself and add it to your goals for the following day or week. Practice full acceptance of yourself and know that all is coming!

Simply believe!  

Libby

PS - Make sure to sign up for my NEWSLETTER.  If you do it through the pop-up window on my website, you will automatically be given access to my new and highly informative article called, "Top 10 Reasons to Practice Yoga." This inspiring guide also has links to additional articles that go deeper into each subject. Email me if you are already signed up for my newsletter and I will send you the password and instructions to access these tips.  You will also receive the password in my next newsletter that I am currently writing.  Thanks so much for your support and interest!